Close
Page 1 of 5 12345 LastLast
Results 1 to 10 of 42

Thread: Farmhouse Table

  1. #1
    Grand Master Know It All Sharpienads's Avatar
    Join Date
    Dec 2010
    Location
    Colorado Springs
    Posts
    3,403

    Default Farmhouse Table

    While I was helping my dad replace his deck, I got the inspiration to use some of the old redwood decking to make a farmhouse table. I did some research online and came up with a plan. The top is 36"x72". Here's the progress so far:

    Here are the original stairs that I used to make the tabletop:


    The boards were about 9" wide. I cut them down on the table saw to about 8" and used a 2x6 for the middle board that I cut down to about 5" wide:


    I bought a little 12" planer to thickness the boards. It worked well, but sniped about 2 1/4" on each end of the boards. No big deal, I just cut the ends off. I tried to match the grain as much as possible while trying to line up the old screw holes as much as possible:


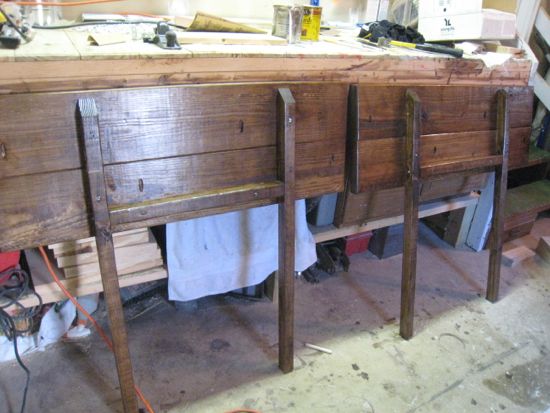
    The hardest and most tedious part so far has been trying to join the edges of the boards together. I don't have a jointer, so I did it by hand. It sounds simple in theory, but I assure you it is not. At least not for a guy with my level of skill (which is almost non-existent). By this time I was getting tired and a little frustrated with the top, so I decided to work on the legs and apron.
    Kyle

    Girlscouts? Hmmm, I don't know... I think it's kinda dangerous to teach young girls self esteem and leadership skills.

  2. #2
    Grand Master Know It All Sharpienads's Avatar
    Join Date
    Dec 2010
    Location
    Colorado Springs
    Posts
    3,403

    Default

    I built the apron out of 2x4s and the legs out of 4x4s. The legs are 30" tall and the table top overhangs the apron by about 2 1/2".


    I used a hand saw and a chisel to flatten one corner of the legs and screwed in hanger bolts. I realized that the ends probably needed more support, so I added some extra support brackets. I wanted to be able to take the table apart, since it will be pretty heavy, so I decided to go with the corner braces. It worked out pretty well, I think, and is very stable. I used a drill press to drill the holes at an angle. On this corner, my hanger bolts are a little crooked, but this is the worst one. The others turned out really good:


    Next I used a router to cut channels in the apron in case I decide I want to add extensions later on. You can see the extra braces I added on the inside of the channels:

    Kyle

    Girlscouts? Hmmm, I don't know... I think it's kinda dangerous to teach young girls self esteem and leadership skills.

  3. #3
    Grand Master Know It All Sharpienads's Avatar
    Join Date
    Dec 2010
    Location
    Colorado Springs
    Posts
    3,403

    Default

    Alright, back to the table top. I used dowels, glue, and screws to attach the boards together.

    The self-centering doweling jig worked out really well. Except for one hole that I drilled in the wrong spot. This wasn't my only mistake, but this one was easily fixable:


    I used a Kreg pocket hole jig to drill pocket holes. I think I used 9 dowels and 10 screws on each board:


    The table top is now almost complete, I just need to add the breadboards:


    I attached the breadboards the same way, dowels, glue, and screws. Unfortunately, I drilled one pocket hole on the top instead of the bottom


    After a lot of sanding, I'm still no where near finished with the top. I plan on staining the top a dark brown. The color that Mrs. Sharpienads and I picked out was Espresso. It was between that and Jacobean, and since I have no idea what a Jacobean is, I chose Espresso.


    The apron and legs are painted courtesy of Mrs. Sharpienads:


    Man, this has been a lot of work. I've been working on this in my free time for about 3 weeks now. I'm really just kinda making it up as I go, since I wouldn't even qualify myself as an amateur woodworker. But I've been happy with the results so far. It's turning out to be a little more "rustic" than I originally planned, but Mrs. Sharpienads says she likes the rustic look. I need to finish prepping the top for staining and then assemble the entire thing. I ordered some figure 8 fasteners to attach the top to the apron.
    Kyle

    Girlscouts? Hmmm, I don't know... I think it's kinda dangerous to teach young girls self esteem and leadership skills.

  4. #4
    Fire Crotch
    Join Date
    Nov 2009
    Location
    Charlottesville, VA
    Posts
    6,508

    Default

    Dang, nice work. Can't wait to see the finished product!

    I felt the same way when I built my reloading bench, I had no idea what I was doing and it came out very nice. But I too screwed up and screwed the laminate top with too long of a screw and it poked out the top. And thats why I have a day job

  5. #5
    Iceman sniper7's Avatar
    Join Date
    Mar 2008
    Location
    Brighton
    Posts
    16,986

    Default

    Nice work!
    All I have in this world is my balls and my word and I don't break em for no one.

    My Feedback

  6. #6
    Amateur meat smoker blacklabel's Avatar
    Join Date
    Feb 2005
    Location
    Greeley
    Posts
    6,557

    Default

    That looks really good. Are you going to distress it at all?

  7. #7
    Grand Master Know It All Sharpienads's Avatar
    Join Date
    Dec 2010
    Location
    Colorado Springs
    Posts
    3,403

    Default

    Thanks for the kind words, guys.

    Quote Originally Posted by blacklabel View Post
    That looks really good. Are you going to distress it at all?
    Probably not, it's already pretty distressed. There are holes, knots, dents, etc. all over it already.
    Kyle

    Girlscouts? Hmmm, I don't know... I think it's kinda dangerous to teach young girls self esteem and leadership skills.

  8. #8
    QUITTER Irving's Avatar
    Join Date
    Nov 2008
    Location
    Denver, CO
    Posts
    46,527
    Blog Entries
    1

    Default

    Very well done. I hear you on the feeling like you don't know what you are doing. A few questions:

    1) Did you look up plans for building a table so you knew how to put in those corner braces, or did you just look at other tables?
    2) How are you going to add an extension when the boards on the table top go the long way?
    3) Has it cost you 3x what you thought it would yet?
    4) Have you gone on a shopping spree buying tools that you've never even heard of before, but are now sure that you NEED?

    Finally, in college my parents gave me this solid oak table that was 4" thick all the way through, with legs to match. This table looked like it belonged to King Arthur. We would throw poker parties and the people would pound on the table all night long and no drink would even quiver, let alone spill. It was the best table ever made, and I left it outside on a deck for a year and it was in pretty bad shape when I moved out (and wouldn't fit into my car), so I left it. In short, I'm envious of your awesome solid wood table.
    "There are no finger prints under water."

  9. #9
    Grand Master Know It All Sharpienads's Avatar
    Join Date
    Dec 2010
    Location
    Colorado Springs
    Posts
    3,403

    Default

    Quote Originally Posted by Irving View Post
    Very well done. I hear you on the feeling like you don't know what you are doing. A few questions:

    1) Did you look up plans for building a table so you knew how to put in those corner braces, or did you just look at other tables?

    I did some research about different ways to build tables, but mostly just looked at pictures. This one is a combination of 4 or 5 different table designs that I looked at.

    2) How are you going to add an extension when the boards on the table top go the long way?

    I have some left over boards. Basically they will be like the breadboards, with 2 2x2s screwed into the bottom. The 2x2s will slide into the channels. Here's a pic of somebody else's to help explain:

    3) Has it cost you 3x what you thought it would yet?

    Yes, at least 3x. I didn't keep track of how much I've spent. The single most expensive part was the power planer. I bought it off craigslist. I would have just taken the boards somewhere, but nobody wanted to run old boards that could contain nails, screws, dirt, etc. through their machines. I'd say that in total, I spent around $400.

    4) Have you gone on a shopping spree buying tools that you've never even heard of before, but are now sure that you NEED?

    Just the self-centering doweling jig. Everything else I either had already or had heard of before/knew I would need.
    Last edited by Sharpienads; 12-26-2013 at 20:35.
    Kyle

    Girlscouts? Hmmm, I don't know... I think it's kinda dangerous to teach young girls self esteem and leadership skills.

  10. #10
    Master of the Metallic Element Tinelement's Avatar
    Join Date
    Feb 2011
    Location
    Broomfield
    Posts
    3,463

    Default

    Beyond bad ass man.

    Nice work!

Posting Permissions

  • You may not post new threads
  • You may not post replies
  • You may not post attachments
  • You may not edit your posts
  •