


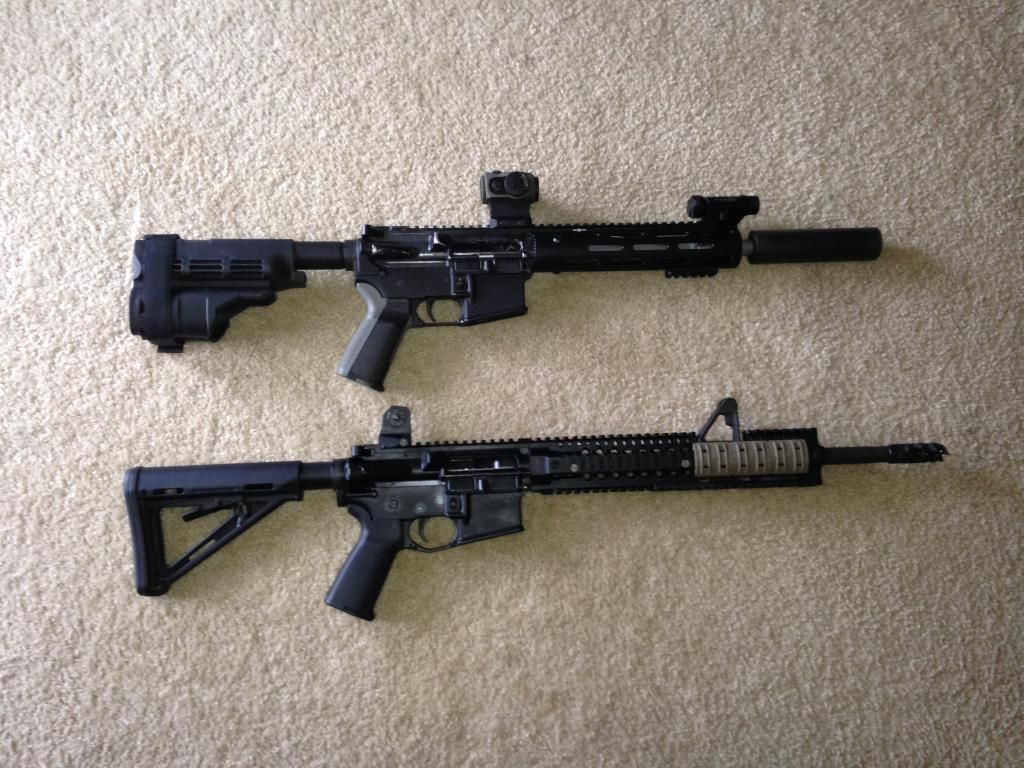
My new AR pistol build is complete. It's fan-effin-tastic!!
here it is with a 16" carbine below it.
yay for the Sig Tac arm brace!

Colorado AR-15 Shooters Club Discussion Forums
Welcome to the Colorado AR-15 Shooters Club Discussion Forums.
Welcome to the Colorado AR-15 Shooters Club Discussion Forums.

My new AR pistol build is complete. It's fan-effin-tastic!!
here it is with a 16" carbine below it.
yay for the Sig Tac arm brace!
Just doing what I can to stay on this side of the dirt.
Lower Receiver:
Sig Tac SB15 arm brace
Spikes pistol buffer tube
Sprinco 'red' spring
H6 Buffer
Magpul MIAD grip
CMMG LPK
Anderson Man. Lower receiver
Just doing what I can to stay on this side of the dirt.

Looks good! Are those sig brace adjustable?
For length, it can be pushed farther onto the tube.Originally Posted by DEAGLER

its meant for a 1.0-1.1" tube, and mine is about 1.2". it's a snug fit.
Just doing what I can to stay on this side of the dirt.
The build process was straight forward.
The CMMG lpk was packaged into color coded bags. I never got the instructions figured out, and I knew what went where, so I just started assembling the lower. The only trickey part is when it comes to screwing on the buffer tube and keeping the end plate away from the rear take down detent spring. If you're not entirely sure of how that part goes, you WILL find out the sound that spring makes when it shoots across a room. (It sounds like, "Fffffffuuuuuuuuuuuu..............!!!!!!!!!")
Just doing what I can to stay on this side of the dirt.
Upper Receiver
Colt receiver
Rainier Arms parts kit
Rainier Arms BCG
Rainier Arms Match Barrel (10.5", carbine length gas, .223 Wylde chamber, 1/8 twist, Shilen blank)
Carbon Arms gas block
carbine gas tube
VTAC 9" hand guard
Aimpoint H-1 on a Daniel Defense lower 1/3 co-witness mount
Gemtech Trek suppressor
Just doing what I can to stay on this side of the dirt.
Tomorrow I'm going to a range where I can get some quality time seeing what it can do at distance. Just imagine if this thing can still hold MOA performance at 100!!
Just doing what I can to stay on this side of the dirt.
Tap the hole for #4-40. Shorten the spring and install a set screw. Problem solved.
"It takes considerable knowledge just to realize the extent of your ignorance"
Thomas Sowell
www.timkulincabinetry.com
See our reviews below:
http://www.thumbtack.com/Tim-Kulin-C...service/788419
If you go this route, let me know.
I did this on mine and bought a bag of 100 set screws, so I have a few extra
Here's the price-list for this build:
AR Pistol Build
Barrel: $199.95
Rail: $156.75
Barrel Nut: $7.95
BCG: 113.96
Upper Parts Kit: $22.00
Gas Block: $70
Gas Tube: $10
Muzzle Device: already on hand
Upper Receiver: already on hand
Upper Total: $580.61
Lower Receiver: $80
Lower Parts Kit: $55
Receiver Extension: $35
Buffer And spring: already on hand
Arm Brace: $145
Lower Total: $315
Total Cost: $895.61
Just doing what I can to stay on this side of the dirt.
 Posting Permissions


 Reply With Quote