Close
Page 5 of 14 FirstFirst 12345678910 ... LastLast
Results 41 to 50 of 132
  1. #41
    QUITTER Irving's Avatar
    Join Date
    Nov 2008
    Location
    Denver, CO
    Posts
    46,527
    Blog Entries
    1

    Default

    I visited the site you recommended, and that will be my next exploration is a way to use a five gallon bucket full of fish, to water a vertical pipe full of herbs. Except for the guys at Agrobright and ColoradoAquaponics, everyone seems to still be using dirt in their vertical stuff.

    In your system, do you just have a constant (low) flow of water from the top of the fence post, that drains directly back into the fish tank, or is it a similar fill and drain system like in traditional aquaponics?
    "There are no finger prints under water."

  2. #42
    Don of the Asian Mafia ChunkyMonkey's Avatar
    Join Date
    Mar 2009
    Location
    Centennial, CO
    Posts
    8,397
    Blog Entries
    1

    Default

    Constant flow.. Extremely simple... Pond -> pump to the top -> split to 5 pillars. First pillar with the most water pressure is good for spinach, tomato plants etc that requires steady water... Last pillar with the least amount of water is for herbs such as rosemary, basil etc. water comes out clear from the bottom. I will probably rehang these this weekend and take some pict.

    bell siphon or afnan siphon both actually require the correct water pressure range to work.
    Last edited by ChunkyMonkey; 03-20-2013 at 00:56.
    Quote Originally Posted by crays View Post
    It doesn't matter how many rifles you buy...they're still cheaper than one wife, in the long run.
    Coarf Feedback
    Instagram

  3. #43
    QUITTER Irving's Avatar
    Join Date
    Nov 2008
    Location
    Denver, CO
    Posts
    46,527
    Blog Entries
    1

    Default

    Yes, all the instructional sites about bell siphons tell you about the water pressure. I haven't found that to be too difficult to deal with, as the $10 pump I bought has an adjustable flow built right in and I was able to dial in the flow. If you get a pump without an adjustment, you can just add a "T" with a ball valve to control the flow.

    My next questions for you are:
    1) Do you feel like the plants last to get the water (bottom) receive less nutrients than the ones at the top?
    2) Are you using the pre-made vertical posts with the filler material and special zip hook, or have you built your own?
    3) If you are constructing your own, what material are you using for the plants to grow in?
    4) When you remove a plant, do you have to remove ALL the grow material, so as to clean out the plant's roots?
    "There are no finger prints under water."

  4. #44
    Don of the Asian Mafia ChunkyMonkey's Avatar
    Join Date
    Mar 2009
    Location
    Centennial, CO
    Posts
    8,397
    Blog Entries
    1

    Default

    Quote Originally Posted by Irving View Post
    Yes, all the instructional sites about bell siphons tell you about the water pressure. I haven't found that to be too difficult to deal with, as the $10 pump I bought has an adjustable flow built right in and I was able to dial in the flow. If you get a pump without an adjustment, you can just add a "T" with a ball valve to control the flow.

    My next questions for you are:
    1) Do you feel like the plants last to get the water (bottom) receive less nutrients than the ones at the top?
    no, I use clay balls and they work great as far as water flow. The lesser water part is not about top to bottom... I was talking about the pillar closer to the water pump gets more water than the furthest away one. However, the uneven water pressure could have been solved by drilling small holes.
    2) Are you using the pre-made vertical posts with the filler material and special zip hook, or have you built your own?
    $15 vinyl fence post comes in 4' and 6'... Don't get the ones with the long slit on one side. I found that drilling holes is better than the ore cut top to bottom slit... As the later one spill more water to the side.
    3) If you are constructing your own, what material are you using for the plants to grow i
    clay balls... So much lighter for my setup
    4) When you remove a plant, do you have to remove ALL the grow material, so as to clean out the plant's roots?
    remove them completely, dump the clay balls onto large container, power wash, dry and store them for next season
    Quote Originally Posted by crays View Post
    It doesn't matter how many rifles you buy...they're still cheaper than one wife, in the long run.
    Coarf Feedback
    Instagram

  5. #45
    QUITTER Irving's Avatar
    Join Date
    Nov 2008
    Location
    Denver, CO
    Posts
    46,527
    Blog Entries
    1

    Default

    I'm using the clay balls in my set-up as well. Good to know I can use them, as I already have some left over. Thanks.
    "There are no finger prints under water."

  6. #46
    QUITTER Irving's Avatar
    Join Date
    Nov 2008
    Location
    Denver, CO
    Posts
    46,527
    Blog Entries
    1

    Default

    Just got a call about this thread, and it reminded me to come in here and ask about using LED lights as grow lights. I know they make LED fish tanks now, but can you use LED lights as grow lights? I know nothing about what makes grow lights different from fish, reptile, or other florescent lights, but I know LEDs cost less to run. Anyone have any ideas?
    "There are no finger prints under water."

  7. #47
    Official Thread Killer rbeau30's Avatar
    Join Date
    May 2011
    Location
    AURORA, CO
    Posts
    2,631

    Default

    Alright, I am buying a house, and moving in next month hopefully this month but yeah.

    I do not have a lot of room for a large greenhouse, but trying to research a theory. I have seen a lot of folks online use 55 gallon drums for the fish. I have also heard that folks in cooler climes use perch instead of tilapia that prefer warmer tropical like climes.

    Also since my HoA might frown upon a big and tall greenhouse (I think the limit to anything can't be taller than 1 foot above the 5 foot fence). So to save space and maximize growing real estate, 2 or 3 buried drums would act as a pond and could easily be tucked away under the grow beds and this would act to keep the water warm enough in the winter months and cool enough in the summer months..


    What do you all think?

  8. #48
    Beer Meister DFBrews's Avatar
    Join Date
    Dec 2010
    Location
    With the classyish Hipsters...Stapleton
    Posts
    3,175

    Default

    Look into the 275 gallon food grade totes there are a lot in Craigslist cut the top off about 8 inches down keep the frame intact you now have a large resivour for fish and flip the top over and have a great grow bed
    You sir, are a specialist in the art of discovering a welcoming outcome of a particular situation....not a mechanic.

    My feedback add 11-12 ish before the great servpocaylpse of 2012

  9. #49
    Official Thread Killer rbeau30's Avatar
    Join Date
    May 2011
    Location
    AURORA, CO
    Posts
    2,631

    Default

    Quote Originally Posted by DFBrews View Post
    Look into the 275 gallon food grade totes there are a lot in Craigslist cut the top off about 8 inches down keep the frame intact you now have a large resivour for fish and flip the top over and have a great grow bed
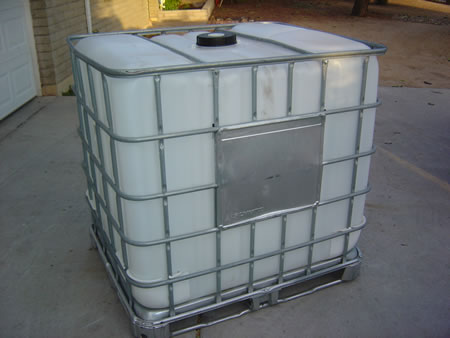
    one of these? I can see how that would work nicely, the top will support the cut off "lid" perfectly. Fill hole can be adapted to become a drain hole.

  10. #50
    a cool, fancy title hollohas's Avatar
    Join Date
    Mar 2010
    Location
    Littleton
    Posts
    6,071

    Default

    Quote Originally Posted by Irving View Post
    Just got a call about this thread, and it reminded me to come in here and ask about using LED lights as grow lights. I know they make LED fish tanks now, but can you use LED lights as grow lights? I know nothing about what makes grow lights different from fish, reptile, or other florescent lights, but I know LEDs cost less to run. Anyone have any ideas?
    Irving - You will pay A LOT to buy LED fixtures that produce the same amount of light (lumens) as equivalent fluorescent or HID fixtures. The reason most mainstream LED fixtures these days cost less to run is because they are actually giving you less light. Only the most expensive LED fixtures are as efficacious (lumens/watt) as fluorescent fixtures when you need a lot of light. It's easy and cheap to buy a single LED lamp (bulb) that has the same lumens per watt as a fluorescent lamp but you will need lots and lots of them to get the amount of light you need to grow efficiently. If you want a single LED fixture that produces the same amount as a $20, 2-lamp T8 fluorescent shop light (around 6,000 lumens), you will need at the very least a 60 watt LED fixture. And only the very best and most expensive 60 watt LED fixtures will be efficacious enough to produce 6,000/lumens (or in other words, produce 100 lumens per watt). Try to Google a 60W LED fixture that produces 100 lumens per watt. You will be surprised at what you find. It won't be $20. And don't be confused by 60 watt equivalent LED lamps. That's just telling you it's about the same amount of light as a 60W incandescent and will typically only be about 13 watts and give you 600-800 lumens rather than the 6,000 I used in my comparison.

    But if you do buy LED fixtures, only buy models that specify not only the wattage, but the lumen output as well. All LED fixtures/lamps will say the wattage. That means NOTHING. You are concerned with lumens.

    The other aspect of LED lighting is that only the most expensive fixtures will be full spectrum. Most of the cheap varieties will be highly favored on the blue side of the spectrum because the blue phosphors are the cheapest and most efficacious. Most plants need full spectrum lighting because that's what they get from mother nature. Many expensive LED grow lights have an adjustable spectrum to allow the grower to custom tailor the light color to best match the plant's changing needs during it's life but IMO that's simply not necessary for the home veggie grower.

    To get the best use out of any indoor grow lighting it needs to be very close to the plants. I mean inches above them. Most garden veggies require "full sun". That applies to not only time but also amount. The amount of light falling on a surface is measured in foot-candles. Outdoor, mid-day, non-overcast sun in our region measures 10,000+ foot-candles. To give you a comparison, a 4ft, 2-lamp fluorescent 32watt T8 shop light measures around 500 fc 4 inches below the fixture. 12 inches below the fixture it measures around 200 fc. So you can see, for your indoor veggies to thrive in conditions most like mother nature intended, get those lights as close to the plants as possible to benefit from the increased foot-candle level. I made that mistake a few years ago. My lights were mounted too high and my plants grew skinny and tall as they reached for the light. Now I put my lights on an adjustable chain so I can keep them only inches above the plants even as they grow. Now they grow thick and strong. You do not have to worry about over-heating your veggies with fluorescent lighting mounted almost touching the plants. Sometimes I get lazy and don't move my lights. I have had plants in direct contact with my T8 fluorescent fixtures for days on end without any negative effects.

    I personally use a combination of different color temperature lamps in my grow lights. I use a mixture of 6500k and 3500k fluorescent lamps to make sure I am covering the spectrum. These are marketed in a variety of names but generally are something like "daylight white" and "warm white" respectively.
    Last edited by hollohas; 08-04-2013 at 12:49.

Posting Permissions

  • You may not post new threads
  • You may not post replies
  • You may not post attachments
  • You may not edit your posts
  •